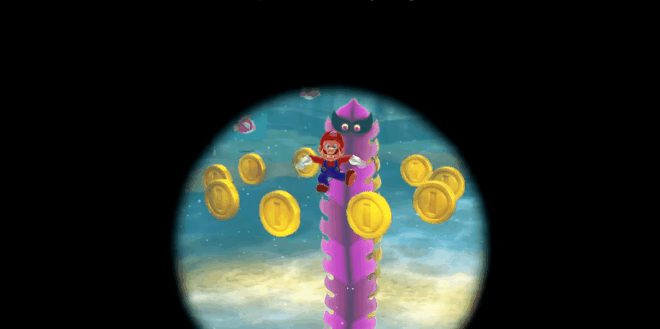
Hi everyone! This is my first time writing a post like this, so I hope it’s helpful! While developing my platformer game a while ago, I wanted to add a classic circular fade-to-black transition for when the player dies — similar to what you might see in cartoons or 3D Mario games. When the player’s health reaches zero, the screen fades out in a circular shape, and when they respawn, it fades back in.
At first, I struggled to find any references or tutorials on how to create a Cartoon-style death transition. After experimenting for a bit, I figured out a simple way to achieve this effect. So, I thought I’d share how I did it here!
Let’s jump into how you can create this transition in your own game.
Creating the Material#
- First, create a new Material. Set the Material Domain to User Interface and the Blend Mode to Translucent.
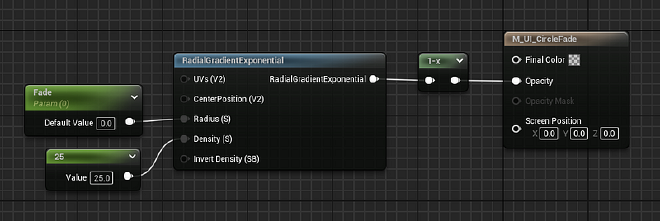
- Add a Radial Gradient Exponential node and two Float nodes. Convert the first float into a parameter and name it something like “Fade,” then plug it into the Radius pin of the RadialGradientExponential node.
- Set the second float to a large number (I used 25) and plug it into the Density pin. This makes the edge of the circle sharp instead of blurry.
- Now connect the output of the radial node to a OneMinus node. We want the circle to fade outward, so this inverts it.
- Finally, connect the output of the OneMinus node to the Opacity on the material result node.
Setting Up the Widget Blueprint#
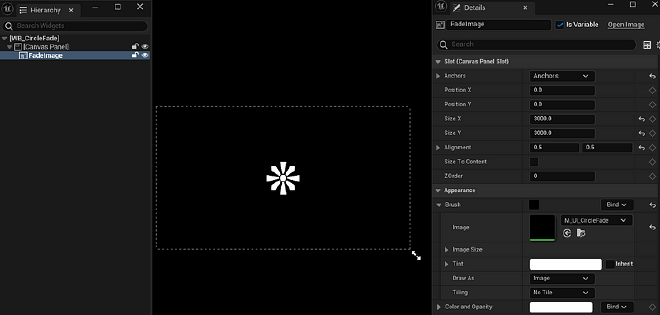
- In your Widget Blueprint, add a Canvas Panel widget, then add an Image widget under it.
- Click the image widget, go to the Details panel, and rename the image to something like “FadeImage.” Turn on the Is Variable toggle (top-right in the Details panel).
- Under Appearance > Brush, select the image and set it to the material we created earlier.
- Set the Anchor to Center, and make the Size X and Size Y big enough to cover the screen (I used 3000x3000).
- Set the Alignment to 0.5 for both X and Y.
Adding the Fade Animation#
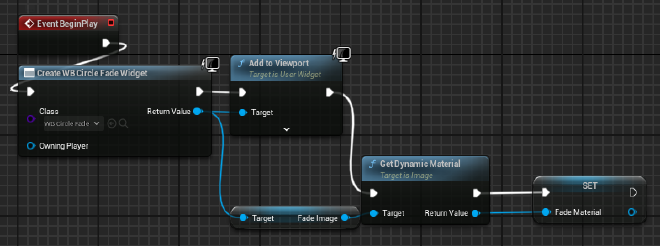
- Inside the blueprint that we want to use, Create the Widget Blueprint that we made previously
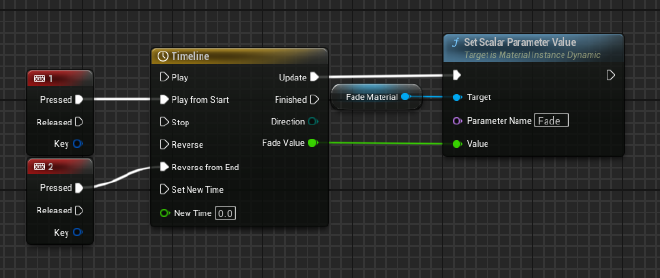
- From the Create Widget node, get the FadeImage from the return value and add the Get Dynamic Material node. Promote the material to a variable, calling it something like “FadeMaterial.”
- Now we can create the fade animation using a Timeline node. Inside the timeline, add a new track and call it FadeValue. Set the duration to 1 second (or whatever value you want).
- Add two keyframes to the curve: one at time 0 with a value of 0, and another at time 1 with a value of 1. Select both keys, right-click, and choose Auto Key Interpolation to smooth the animation. Feel free to experiment by adding more keyframes and tweaking them to get the exact effect you’re looking for.

- Back in the event graph, drag in the FadeMaterial variable and use a Set Scalar Parameter Value node. Type “Fade” (the parameter we created in the material) as the parameter name.
- Connect the FadeValue float from the timeline to the Value pin of the Set Scalar Parameter Value node.
- For testing, I used a keyboard press event to trigger the fade. You can connect it to the Play from Start on the timeline to test the transition. I also added another keyboard press event trigger to test it playing reversed. And that’s it!
Here’s the result:

Thanks for reading!